Comp-111 Lab 1
Franklin University
- Instructions - Posted on Piazza
- Data Files - Posted on Piazza
- Readme.txt
- WebCat
Each lab that you will work on is really just a small piece of a bigger picture. Think of it as a component. You will be writing one small component for this lab and then in lab 2 another small component and in lab 3 another component and eventually in lab 5 we'll pull the various components together. So, if you're expecting wonderful exciting things with this first lab, you will be disappointed. It is just one small component that will be used by another program, yet to be written. That's really what Java is all about, creating modularized type programs that are used by other programs. This is actually what makes Java so very powerful. By modularizing things, if there is a change that needs to be made it can be made to just that 1 module which will then be realized by all programs that call that module. If there is a mistake in a calculation, it needs to be corrected in only that 1 module and again it will be realized by all programs that call that module.
Ok - now for lab 1.
Step 1 - read through the lab instructions in the Word document. While the scenario presented is for fun, there is some key information that should be gleaned from the instructions.
- you will be creating a STATION class that is to module one of the SOUP stations
- The question you might be asking is how can a program model a gas station. Good question. It's not going to model a gas station in the sense of being a visual representation of a gas station. Instead the model is one of data. What might we need to know about a gas station data-wise? Name and location are a couple of things that come to mind.
- four instance fields - a description, price per gallon, lattitude, longitude
- instance fields are the data/information that needs to be stored for an object
- description - this will describe the station, might be a name or physical description; this will be a string variable containing alphanumeric data
- price per gallon - for this lab we are assuming that the SOUP station sells just one type of gas and as a result has just one cost, it is stored in this instance field; price typically contains decimal information so will be a variable of type double
- lattitude & longitude - the location of this SOUP station will be represented in longitude & lattitude, it would be much easier for us if it were just stored as a street address, but longitude & lattitude allow for greater flexibility in calculating distances and even provide potential for GPS applications; longitudes & lattitudes contain decimals and will be type double
- one constructor without parameters and one constructor with parameters
- A constructor is a special method in a class. It is what actually creates the class object, in our case a STATION object.
- constructor without parameters - A constructor without parameters is called the default constructor. This is the constructor that is used when there are no parameters. It creates a "vanilla" or plain object. With a default constructor the instance fields (description, price per gallon, lattitude, longitude) are set to default (empty) values and are assigned actual values later on.
- The default values will be:
- price per gallon = 0.0
- latitude = 0.0
- longitude = 0.0
- description = "NO DESCRIPTION PROVIDED"
- constructor with parameters - A constructor with parameters is called an explicit constructor. Values are explicitly provided. With this type of constructor the instance fields are assigned the values in the parameters.
- Sometimes there are multiple explicit parameters. For example, when creating a STATION object we might know the description of the station, but perhaps the price per gallon has not yet been set, or the specific location has not yet been determined. With this type of constructor, the instance fields are assigned the value of a parameter if provided and assigned a default value if not provided.
- The explicit constructor for this class will have 4 parameters, one for latitude, longitude, price per gallon, and description.
- setter & getter methods
- A set method is a mutator method. It changes (mutates) the value of an instance field. Typically a set method has an explicit parameter passed to it. The associated instance field is then assigned the value of this explicit parameter.
- For example, public void setDescription(String inDescription)
- In green above you see the initial declaration statement for a method.
- void - this indicates that nothing is returned from this method
- setDescription - this is the name of the method
- String - this is the data type of the explicit parameter
- inDescription - this is the explicit parameter provided to the method
- This is strictly a variable that has been given the name inDescription. It could have been named anything - newDescription, input, x, y, anything, but it's usually a good idea to provide a variable name that describes what it contains. In this case inDescription says that this is data that is coming IN and that the data is a DESCRIPTION. This could be abbreviated to inDesc and it would still be just as descriptive. Abbreviating it even more to inD, however, might be easier to type, but doesn't really provide the type of information you are looking for in a variable name.
- What this method will do is assign the value contained in the inDescription variable to the object's associated instance field.
- A get method is an accessor method. It accesses the instance field(s) of the object and returns information. This type of method does not usually have explicit parameters - although it could.
- For example, public STRING getDescription()
- In green above you see the initial declaration statement for a method
- String - this is the data type of the information that will be returned
- getDescription - this is the name of the method
- Notice that empty parenthesis follow the method name - this means that no explicit parameters are passed to this method.
- What this method will do is return the value of the associated instance field, the description.
- formula for the computation of distance using lattitudes and longitudes
- sqrt(x * x + y * y)
- where
- first location is [lat1, lon1]
- second location is [lat2, long2]
- x = 69.1 * (lat2 - lat1)
- y = 53.0 * (lon2 - lon1)
Step 2 - now let's take a look at the program documentation. The javadocs have already been created for you in this project. Javadocs provide a description of each method including the purpose, what will be returned, if anything, and what explicit parameters are to be provided, if any. This is really helpful information that you will definitely want to check out before you begin working on your test cases - which is what you should do BEFORE you begin working on the program itself.
To generate the documentation in BlueJ, select TOOLS, PROJECT DOCUMENTATION. You might get an error. I did. It's a really long message, but pretty much it boils down to the classes must first be compiled before the documentation can be generated. To compile, right click on each class and select compile. Unfortunately there are some syntax errors in the code which much first be corrected before both the class and test case can be compiled. Correct these syntax errors and then generate your documentation. (Please just correct the syntax errors - don't do any other coding before you get a chance to view the documentation.)
When you are able to view the documentation, you will see a listing for both of the constructors and all of the methods. If you click on a constructor or method name you will be taken to that particular constructor or method where you will be able to see a description of the method. You will also be shown what will be returned, if anything, and what explicit parameters are expected if any. A description of each is provided. This is really useful information and can guide you as you develop your test cases and eventually start working on coding the object itself.
Step 3 - develop the test cases. I know, you're wondering how can I write a test case for a method that doesn't even exist yet. You really can. Because you have reviewed the javadocs you know what the method is supposed to do, you know what explicit parameters are expected and you know what will be returned, if anything. What remains to be done is write the test case code.
Let's use the setDescription method that was discussed above as an example. The javadoc for this method is:
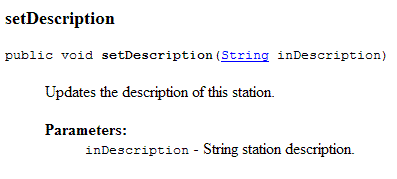
This tells us that the purpose of this method is to update the description instance field of the STATION object. It does not return any information - doesn't say a thing about returning, but it does have an explicit parameter which is contained in the variable inDescription. This variable contains a string value which is the station description.
So, since the purpose of this method is to change the value of the station description instance field, what needs to be tested is that this actually works. The test case should make sure that after this method is called, the description instance field is actually equal to the value that was contained in the explicit parameter. But - how is this done? Good question.
Here's the basic layout of a test case method:
- create the object
- do any preliminary setup needed
- call the method
- verify the method worked using a junit assert statement
- create the object, for Lab 1 the object is STATION. A new instance of this object should be created. It can be created using either the default or explicit constructor - it really doesn't matter for this particular test case.
Station tmpStation = new Station();
Here I have declared a new variable of type Station with the name tmpStation. ( Any variable name could be used, but it should be meaningful. I chose tmpStation to indicate this is a temporary variable of type Station.)
This is a new object instance of the data type Station and it is created with the default constructor - no explicit parameters are indicated (nothing between the parenthesis).
- do any preliminary setup - none is needed for this test. Preliminary setup might be any calculations or other objects that are needed for a correct test.
- call the method
tmpStation.setDescription("Tinas SOUP Station #12");
Above the setDescription method is called. An explicit parameter is passed to the method of data type String. The value contained in this parameter is "Tinas SOUP Station #12".
The format for calling a method is: objectName.methodName(parameters). My object name is tmpStation. My method name is setDescription. There is only 1 parameter which is specified as an actual string value, contained in the quotes.
- verify the method worked using junit assert statement
Now
what I want to verify is that the instance field in my station object
(tmpStation) has been set to the value Tinas SOUP Station #12. I
can use the junit assert method to do this. What I have to do is
retrieve the value of the instance field from the object (using another
method) and then compare this value against what I expect it to be
equal to, in this case "Tinas SOUP Station #12".
assertEquals("Tinas SOUP Station #12", tmpStation.getDescription());
The first explicit parameter provided to this method is what I'm expecting the value to be equal to, and the second explicit parameter provided is the actual value.
OK - for my actual value I have: tmpStation.getDescription(). This is another method call that retrieves the description instance field from the method. It returns a string value. That string value is compared against the value I provided. If they are equal the assert method returns a value of true and the test passes. If they are not equal, the assert method returns a value of false and the test does not pass.
If the test does not pass, then there is a problem with the method.
For Lab 1, all of the test cases have been provided for you. There are two instances where you need to provide values to the test cases. These instances can be found in:
- testCalcPricePerGGE()
- Here you will provide a value to the setPricePerGallon() method call other than 0.0. Then you need to manually determine what should be returned from the calcPricePerGGE() method call and fill in the value.
- testCalcDistance()
- Here you will determine what value should be returned from a call to the calcDistance when the values -34.6 & -58.35 are passed to the method. You will manually calculate this value.
Step 4 - code the STATION class. Open the Station class. What you'll find is that the majority of the class is already written for you. There is just one method for you to complete, the calcPricePerGGE() method. This method calculates the price per gallon of the bioFuel. Remember that the Word instrutions identified the conversion factor as 1.41. In this method look for comment statements that say:
// replace this comment with your code..... or
// replace this comment & return statement with your code....
This is where you will put your code.
There are several syntax errors within the code. Remember you will find these by compiling. The compiler will identify the errors. Continue compiling and correcting errors until you get a clean compile.
After you get a clean compile, run your test cases against the code. Go ahead and run the test cases. To do this, right click on the StationTest class and select Test All. Tests that fail will be indicated by an x. Tests that pass will be indicated by a green check. If any of the tests fail, a red bar will be displayed. If all of the tests pass, a green bar will be displayed. Your goal is a green bar. If a test case fails, take a look at both the test case the class code. Test cases identify logic errors within the program. These could be something as simple as the latitude and longitude have been flipped, or something more difficult with an incorrect calculation. Fix the problem. Continue with this process until everything compiles cleanly and all test cases run successfully.
Step 5 - update the Readme.txt file. Specific information is required to be entered into this file. Make sure you view the instructions for this file so that you do not lose points for an incorrect format.
Step 6 - use the check style feature in BlueJ. This can be found under Tools, Checkstyle. This tool will evaluate your program for style. Each of the classes will be listed. Clicking on a class name will reveal any style problems that have been found. These would include such things as lines that are too long, incorrect indentation, missing periods, etc. Correct all of these identifed problems. Recompile, retest. ****It is really important that you do this. For each check style error found, webcat will deduct 1 pt. These can really add up and you don't want to lose points for things that can easily be corrected.
Step 7 - submit to WebCat. This is not a one time submission. Webcat is a tool that can be used to ensure you receive the maximum number of points possible. Submit, review the output. Make corrections and submit again. Continue this process until you have perfected your lab.